Hello Friends,
Not too long ago I picked up a new hobby of quilting. I'm no expert by any means but I thought I would share some of my first projects. The first thing I made was a baby quilt which I will do a tutorial of soon. The second thing I made was a pleated strip quilt for my good friend Kelly. She requested a quilt as a christmas present and I was excited to have a reason to do another.
I first picked out 8 different fabrics and cut them into 2.5 inch x fabric width strips (most fabrics will be 42 to 43 inches in width making this a nice way to make it uniform. How much fabric you need will depend on the size you want your quilt to be. As this was only my second time using a rotary cutter and mat, know that you can do this too as long as you can be patient. I did it while catching up on my favorite shows on hulu.
For pleated strips you will need 3 (2.5 inch by fabric width strips together).


(Note: I'm one of the prefer not to prewash my fabrics people so these are unwashed.)
The next thing to do is to determine your pattern. You can have a set pattern or not it is up to you. I did every 5th strip pleated because I found it would work out nicely with the fabrics I chose. Please feel free to be creative.
Sew your strips together in the patter that you like leaving for 1/4 inch seam allowance. Ensure that you switch ends that you start each new stripe with or your strips will start to curve quite a bit (I learned this the hard way).
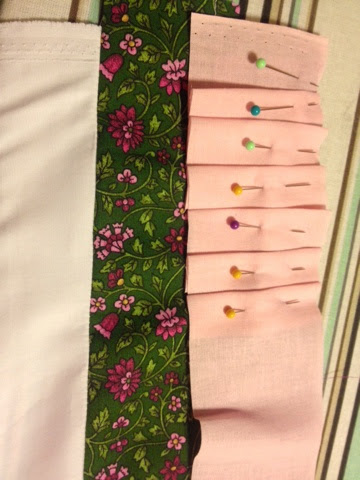 When you get to a strip where you want to do pleating. (remember these are 3 strips sewn together to have enough fabric to do the pleating.) Begin by pining the fabric down and then follow into pleat and pin. This is a little time intensive as you need to pin each pleat. Sew into place, unpin and then pin each pleat to the next strip. While it takes a little longer than just a straight strip you will find that the end result looks great.
 As you continue to sew strips it will begin to look like this. Notice how nice the pleated strip looks! It adds a little flair to the quilt but if it seems like too much you could just do strips. When it gets to the desired length your ready to place the batting, back and bind the quilt together. I did quilt the project by "stitching in the ditch" or sewing the top, back and batting together in the seams between the strips. I did this on every 5th strip to create a nice pattern on the back. Being new to quilting this was a good idea as I was not ready for free motion quilting at this point. This tutorial won't cover these steps as I failed to take pictures of this process for you but I hope to get some together soon, however if you good " binding a quilt" you can find lots of help there.
My final quilt ended up being 42 x 53 a good lap sized quilt. This was the intended size for me but again be creative. The last pictures show the finished product. Keep in mind the way I am holding it in the last one does make it appear as though my stripes aren't straight but they are...for the most part. :)
Handmade projects are a beautiful way to show people that you love them. I encourage you to try this easy project. If you have questions please let me know.
<3
Anita


No comments:
Post a Comment